get the latest
This pattern and online course have been updated. Get your free access to it here.
welcome
Hello and welcome to the Spring Headscarf online crochet class!
I’m so glad you’ve decided to make this design. It’s lovely and easy to make and perfect for pulling on as the days warm up in Spring, or as they’re getting cooler in Autumn.
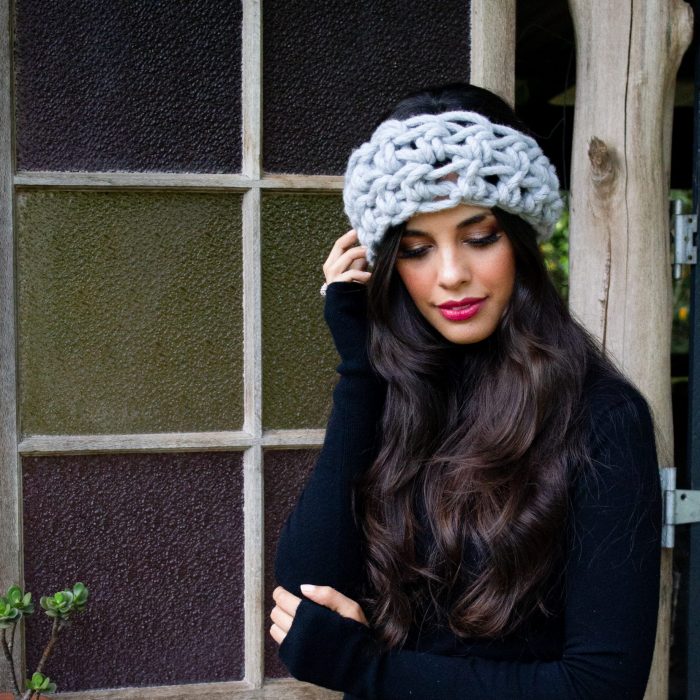
The Spring Headscarf is inspired by growth and renewal, and its texture reminds me of leaves and vines growing and moving. Wearing your Spring Cowl feels light, warm and snuggly – perfect for when the air is crisp, and the sun is warm.
Don’t worry if you’ve never crocheted before – I’ve included simple step-by-step instructions to help you out.
what we’re making
We’re making a chunky Spring Headscarf. It’s crocheted using gorgeously soft merino wool and it won’t take you long to make it.
This gorgeous headscarf is made by crocheting half treble stitches in the round – this creates an open and pretty texture that’s reversible. It starts off by joining the foundation chain, and then each row is joined with a slip stitch before moving onto the next one.
size
The Spring Headscarf is approximately 50cm (19.7in) around and 10cm (3.9in) high.
The gauge (stitch size guide) for this design is approximately 2 rows and 3 stitches in a 10cm (4in) by 10cm (4in) square.
the fine print
This pattern is the original work of Lynda Rennick and is covered by copyright. I ask that you do not share any of this pattern (or your access to it) without my written permission.
before we start crocheting
what you’ll need
To make your Spring Headscarf you will need:
- a 100g (3.5oz) mini skein of Homelea Bliss yarn in your favourite colour
- 25mm (U) bamboo crochet hook – it’s so lovely and light to hold
- scissors
- tape measure
- 1 stitch marker (safety pins or different coloured yarn can be used as well)
- the desire to make something beautiful
how to read this crochet pattern
Before you pick up your chunky crochet hook, I’d love to share with you the basics of reading crochet patterns, and what you’ll come across in this pattern.
I’ve written this crochet pattern so it is easy for you to follow. You’ll find a lot of the elements here (like the terminology and abbreviations) in every good crochet pattern you come across.
Reading crochet patterns is just like eating an elephant – when you take it one bite (or step) at a time, it’s easy to do. The basic elements of crochet patterns are the stitches, and the easiest way to work through a crochet pattern is to go one stitch at a time.
Each type of stitch has a name, and crochet patterns are written in one of two stitch terminologies – UK or US. This pattern is written in UK terminology (with the US terminology in brackets), and there is a US terminology pdf version.
The abbreviations that are used throughout the pattern for the stitch names are summarised in the table below.
abbreviation | UK terminology | US terminology |
ch | chain | chain |
htr | half treble | half double crochet |
slst | slip stitch | slip stitch |
st(s) | stitch(es) | stitch(es) |
Throughout this crochet pattern, you’ll notice curvy brackets at the end of the row – this indicates the number of stitches in the row. For example, {15 sts} means that there are 15 stitches in the row. Counting the number of stitches at the end of each row is a good way to check that you haven’t gained or lost any stitches during the row.
how to make a different size
Changing the size of your Spring Headscarf is easy. Here are a few different ways to do it:
- increase or decrease the number of stitches in the foundation chain to make your cowl longer or shorter, or
- increase or decrease the number of rows to change the height of your cowl, or
- change the size of your yarn or use a different sized crochet hook to change both the length and width of your cowl.
it’s good to know
I’ve found that when I crochet with chunky yarn and a huge hook I hold the yarn and hook differently to when I’m using “normal” sized yarn because of the extra size and weight. To avoid discomfort in my arms and hands I share the crocheting movements between both arms and it becomes a full upper body workout! I also try to be aware of my posture as I’m crocheting.
To have the top and bottom edges of your cowl both showing the beautiful v’s of the crochet stitches we’ll be working the stitches of row 1 into the single loop (or knobbly bit) at the back of the foundation chain stitches.
how to turn your skein into a ball
The first thing you’ll need to do is turn your chunky skein of Homelea Bliss into a ball.
The easiest way to do this is to:
- open up the skein
- lie the skein flat and in a circle in front of you
- untie or cut the loops that are holding the yarn together
- find the end
- carefully unwind some of the yarn
- wrap the end around your fingers a couple of times
- slip the yarn off your fingers, fold it in two and then wind the yarn around this to start creating a ball
- keep carefully unwinding the skein and wrapping it around the ball until you’re finished.
If you’ve mastered the art of winding a centre pull ball on a Nostepinne you can do this too.
Note – if you have a yarn swift you can put the opened skein on your swift and unwind it from here. Most of the time I skip the ball winding and crochet straight from the swift.
foundation chain
make a slip knot
We’re going to start by making a slip knot. Most crochet and knitting patterns begin with one of these – it’s an adjustable loop that becomes the first stitch. There are lots of different ways to do these and each one works fine.
The important thing to remember is that the end attached to the ball needs to make the loop bigger and smaller.
For this pattern, the non-ball end of your slip stitch needs to be at least 15cm (5.9in) long.
place the slip knot on the crochet hook
The slip knot goes onto your crochet hook, and this makes the first stitch.
The size of the slip knot is important for determining the size and consistency of the stitches in your crocheting. With practice, you will discover the right size for your crocheting – don’t be afraid to try different sizes.
how to hold the crochet hook and yarn
There are different ways to hold the crochet hook and yarn, and the best way to do it is to do what feels best for you – the important thing is that you can control the hook. Experiment with different ways until you find something that works for you.
I’m right-handed, and I hold the hook in my right hand and the yarn in my left hand. If you’re left-handed, it’s the other way around.
make the chain stitches
The foundation chain provides the “foundation” for the first row of stitches to be worked into.
To make your foundation chain:
- make a chain:
- wrap the yarn around the hook from back to front, and
- pull the yarn through the loop on the hook.
At the end of a chain stitch, you will only have one loop on your hook. From now on we will refer to a chain as “ch”.
- make another 14 ch. {15 sts}
helpful hint
At the end of each row, it’s a good idea to count the number of stitches is the same as the pattern.
Each chain stitch has a “V” and to count the number of chain stitches simply count the number of “V”s. You should have 15 “V”s.
join the foundation chain with a slip stitch
As the Spring Cowl is crocheted in the round, we’re going to join the foundation chain together with a slip stitch. To do this:
- lie your foundation chain out flat and check it has no twists in it
- bring the first ch of the foundation chain up to the hook and make a slip stitch by doing this:
- slide the hook through the “knobbly bit” of the first ch by going through the front (the side facing you) to the back.
- wrap the yarn around the hook and pull it back through the “knobbly bit”. You should have 2 loops on your hook.
- pull the loop closest to the hook through the other loop on your hook. You should have 1 loop left now.
We’re now going to refer to slip stitches as “slst”, and in this pattern, the slst isn’t counted as a stitch.
- once again, check the foundation chain isn’t twisted – otherwise, your cowl will be all wonky!
row 1
There are only 2 rows in your Spring Headscarf, so let’s get started on the first one!
start with the turning chain
It’s common for crochet patterns to start with a “turning chain” and the purpose of this is to move the yarn to the top of the new row.
To make the turning chain for row 1:
- make 2 ch
- put your stitch marker through the second chain (we’ll be crocheting into this at the end of the row)
In this pattern, the turning chain is counted as a stitch.
half trebles
Now we’re going to do half treble stitches of the row. This is what to do:
- turn the foundation chain over so the “V”s are facing down and the “knobbly bits” are facing up.
- hold onto the “knobbly bit” of the ch that’s on the left side of the chain that you did the slip stitch into at the end of the foundation chain.
- make a half treble (htr / hdc):
- wrap the yarn around your hook (from back to front)
- slide the hook through the “knobbly bit” of the ch you’re holding onto. You do this by going through the front (the side facing you) to the back.
- wrap the yarn around the hook and pull it back through the “knobbly bit”. You will have 3 loops on your hook.
- wrap the yarn around your hook (from back to front) and pull it through the 3 loops on your hook. There will be one loop left on your hook.
We’re now going to refer to half trebles as “htr” (hdc).
- make another 13 htr (hdc) until you reach the end of the row.
- {15 sts – this includes the turning chain}
count the stitches in the row
Normally at the end of the row, you’ll see the stitch count – for example {15 sts}. Since this is the first row, I’ve decided to separate it out and explain a bit about it.
It’s a good idea to count the number of stitches in the row so that you can tell if you’ve added extras or lost some during the row.
Each stitch has a “V” on the top. It’s easy to count the number of stitches,– simply count the “V”s on the top of the row. The only stitch that doesn’t have a V on top is the turning chain. In this pattern, the turning chain is counted as a stitch so count the turning chain (the top of it is marked with the stitch marker) as well.
The number of stitches should be the same as the pattern, in this case, 15.
If you don’t have the correct number of stitches it’s easy to fix – simply work out where the problem happened, pull out your crocheting to this point and redo your stitches. If you need some help with this share a photo on my Facebook Page.
The stitch count doesn’t include the slip stitch (we’ll be doing it next).
join with a slip stitch
Remember how we used a slip stitch to join the foundation chain? Now we’re going to do the same thing to join row 1:
- slst to the second chain in the turning chain (it’s the one we put the stitch marker into)
row 2
Here’s how to do row 2:
- make the turning chain by doing 2 ch and put your stitch marker through the second chain
- do 14 htr (hdc) – this time pass your hook through the 2 loops (or legs of the V) of the stitch below
- slst to the second chain in the turning chain (it’s the one we put the stitch marker into)
- {15 sts – this includes the turning chain}
It’s really that simple!
check the size
Now is a good time to check the size of your crocheting. To do this lie your cowl flat and measure the length and width of it.
The Spring Headscarf design is approximately 50cm (19.7in) around and 10cm (3.9in) high. If your cowl is close to this, it means that your tension is similar to the design.
If your headscarf is smaller than the design – it means that your tension is tighter than the design. You can change this by using a larger crochet hook, or, you can just keep going. You may find that as you progress you’ll relax, and your stitches will get looser (and your rows will get longer).
If your headscarf is larger than the design – it means that your tension is looser than the design. You can change this by using a small crochet hook, or, you can just keep going. You may find that as you get more familiar with making the stitches, your stitches will get closer together (and your rows will get shorter).
If your headscarf is a different size to the design, then you will use either more or less yarn than the design.
secure the last stitch
- leaving a 15cm (5.9in) tail, cut the yarn
- pass the end through the loop and pull it to close and secure the stitch
- tie a knot around where the last stitch has been secured
weave in the ends
Here’s how to weave in the starting and finishing end:
- using your fingers, weave the end through different loops, trying to make it as invisible and uniform as possible
- tie a knot in the end after the last stitch (to keep it from unravelling)
- trim off the end at the knot
- give it a bit of a jiggle and check it sits okay
thank you
It’s been an absolute pleasure to help you crochet your Spring Headscarf – I hope you’ve enjoyed it.
I’d love to see what you’ve made so please share a photo on my Facebook Page.
I desire for all my patterns to be easy to make. I’d appreciate it if you took a couple of moments to leave me some feedback at homelealass.com/feedback.
With love, Lynda.
pdf crochet pattern downloads
Download the pdf crochet patterns: