Free shipping over $100: please allow 1 to 4 weeks for your order to be sent find out more
Colourful crocheting with only a few ends to sew in
Categories:
Crochet Stitches and Techniques, Crocheting
There’s something special about watching a crochet project come to life one row at a time. Every stitch adds texture, personality and a little bit of joy. I’m always drawn to projects that feel playful and bright, especially when they let me mix different shades in fun ways. The only tricky part is finding a method that keeps the making process simple and relaxing.
Colour makes me happy, and I love crocheting with lots of colours! The more the merrier!
The problem with this is that it creates thousands of yarn ends to sew in later (okay, thousands is an over-exaggeration, but it feels like that many). I’d prefer to be crocheting instead of sewing in yarn ends.
I’ve discovered a way I can crochet with gorgeous colours and only have a few yarn ends to sew in. Genius right? This way, I feel the joy of colourful crocheting, but with only a couple of yarn ends to sew in.
Down below, I explain how to do it and even have a video tutorial that shows it in action, but let’s answer a few questions first . . .
Why crochet with different colours?
You know how a grey, overcast day feels slow and mundane, and how a sunny, bright day feels uplifting and fun? Colours have an impact on our emotions and how we feel. Want to feel calm? Use green. Want to feel powerful? Use red. Want to feel uplifted? Use yellow.
Crocheting with a single colour infuses the feelings of that single colour into what we’re making. Sometimes crocheting with the same colour for a long time can feel dull, or even boring.
Crocheting with different colours keeps it interesting and means you’re more likely to finish the project. The added bonus is experiencing the feelings that come from each colour.
Why do ends need to be sewn in?
The start and end of a colour or ball of yarn are secured within the crocheting, and this is called sewing or weaving in ends. This stops the crocheting from unravelling. Ideally, this is done in a way that the end isn’t visible in the finished textile.
- Standard-sized yarns: this is done with a darning needle, which has a large eye and a blunt point. The yarn end is sewn under 10 or 20 loops in the crocheting, trying to keep it hidden.
- Chunky and larger yarns: This is done by felting the ends together to avoid a bulky mess.
When a blanket is crocheted with 1 colour, it’s only the start and end of a ball that needs to be sewn in, but if you add multiple colours, the number of yarn ends increases quickly. Have 10 colour stripes? 20 ends to sew in. 50 colour stripes? 100 ends to sew in. You get the picture.
Are there different approaches to sewing in yarn ends?
Yep! Everyone seems to have a favourite way to handle sewing in ends, and here are a few of them:
- Sew in ends as you go: this stops it from becoming overwhelming, but if you make a mistake and need to pull out the crocheting, the end needs to be sewn in again. Stopping to sew in ends also interrupts the crocheting flow.
- Crochet over the ends: this secures the yarn ends within the crocheting, but it’s not always possible if the pattern has gaps in it. It can create a bulky line when crocheting with thicker yarns.
- Leave it until the end: feel a sense of satisfaction by starting at one side and moving across to the other. This is best done while watching a movie or chatting with someone.
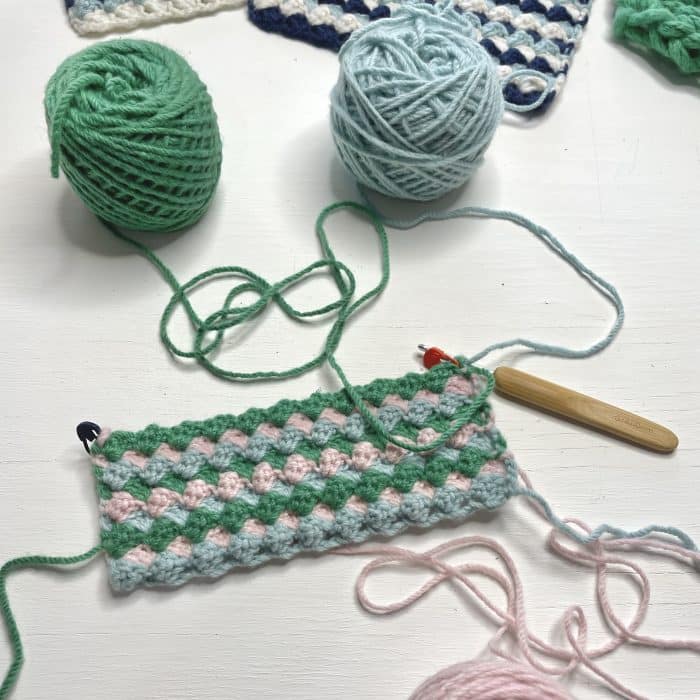
An alternative way – crochet with 3 colours and carry them up the sides
When using 3 colours and crocheting each row with a new colour, there’s always a new colour waiting at the end of the row. Put one colour down, pick another one up – it feels like magic! Crocheting is never dull when there’s a new colour on each row.
For the colour that’s left waiting at the end of the row, carry it up the side of the crocheting. This is done by putting it on top of the colour being crocheted with, so it is caught in the end stitch as it is made. Not sure what I mean? Have a look at the video below.
The only downside to this method is that it can be tricky to juggle the balls so the yarns don’t get tangled. To stop this from happening, only unwind a short length of yarn and rearrange the balls of yarn at the start of each row.
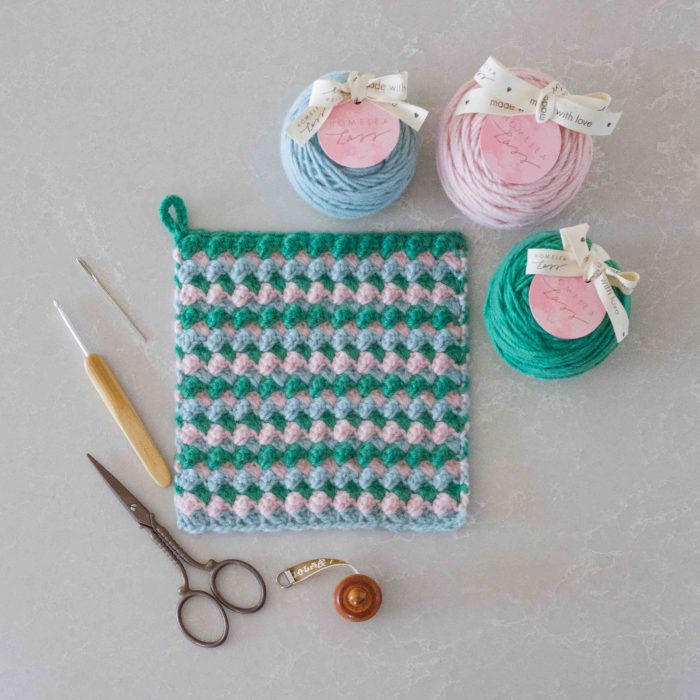
I used this technique when I designed the Happy Potholder crochet pattern, and they’re lots of fun to make!
See it in action – crocheting row 5 of the Happy Potholder practice piece
start of row:
- change the position of the yarn balls so they don’t get tangled
- using the previous row colour, put it across the top of the crocheting and across the top of the current row colour (the previous row colour is now at the back of the crocheting)
- using the current row colour, ch 1 (this is the turning ch and doesn’t count as a st, and it has the previous row colour being carried up through it)
middle of row:
- into the first st – dc (sc) and 2 tr (2 dc)
- repeat the following until there are 3 sts left – skip the next 2 sts and then dc (sc) and 2 tr (2 dc) in the next st (the sts are crocheted into the dc (sc) of the previous row)
end of row:
- skip the next 2 sts and edc (esc) in the last st, carrying the previous row colour up through it: using the current row colour, put the hook into the st below, yarn over and pull it back out of the st below (you have 2 loops on the hook of the current row colour)
- using the previous row colour, put it across the top of the current row colour so it’s at the back of
the crocheting - using the current row colour, yarn over, and pull it through the first loop on the hook
- using the previous row colour, yarn over and pull it through the 2 loops on the hook (you have 1 loop on the hook of the previous row colour)
Give it a go!
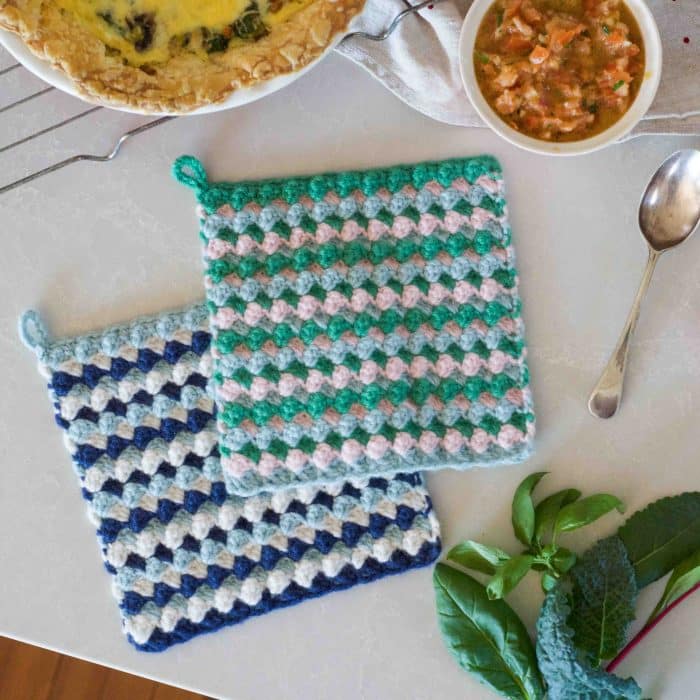
Happy Potholders are small projects that bring handmade happiness into your kitchen. They’re also great gifts to give too!
Try this colourful technique with a crochet kit full of soft, Australian merino wool for maximum heat absorption, or get the crochet pattern and make it with a different yarn. There are detailed video tutorials for both left and right-handed people.
You’ll love learning this technique while crocheting Happy Potholders!
With love, Lynda.
FAQs
1. Can I use this technique with more than 3 colours?
This technique works with 3 colours because there is always a colour ready to pick up at the end of each row.
2. Will carrying yarn up the side make my crochet look messy?
Not if it’s done neatly. The carried yarn sits along the edge and is caught into the end stitch, helping it stay secure and tidy. Adding a border can also help hide the carried yarn if needed, but this can disrupt the visual impact of the colour stripes. Another alternative is to block the finished crocheting and make the edge look tidier that way.
3. Does this method work for all crochet patterns?
This method works well for patterns made in rows, where each row uses a different colour. It will not work for crocheting done in the round.
4. How do I stop the yarn balls from getting tangled?
Only unwind a short length of yarn at a time and rearrange the balls at the start of each row. This makes it much easier to keep the colours organised while you crochet.
5. Do I still need to sew in any ends?
Yes, but only a few. Instead of sewing in ends every time you change colour, you’ll mainly need to sew in the starting and finishing ends, which saves a lot of time.
Author
Lynda | Homelea Lass
Hi! I’m Lynda (she/her) and I’m the lady behind Homelea Lass.
I’m here to help you improve your crochet skills and to help you find peace and happiness in your creative time.
In 2012 I was knocked down by debilitating chronic fatigue that put an end to my blossoming career as a Civil Engineer and Project Manager.
Early on in my illness, I discovered that I could crochet without draining my energy, so I spent my days crocheting, researching yarns and designing – this is how Homelea Lass was born.
My experience with chronic illness has guided me to combine my passion for exceptional design and crochet. I’ve developed a way of crocheting that’s enjoyable, easy to understand, and maximises it’s relaxing and wellbeing properties.
As my healing journey has progressed, Homelea Lass has grown, and I feel blessed that I can share my love of Australian merino wool, chunky crochet and creativity with you.