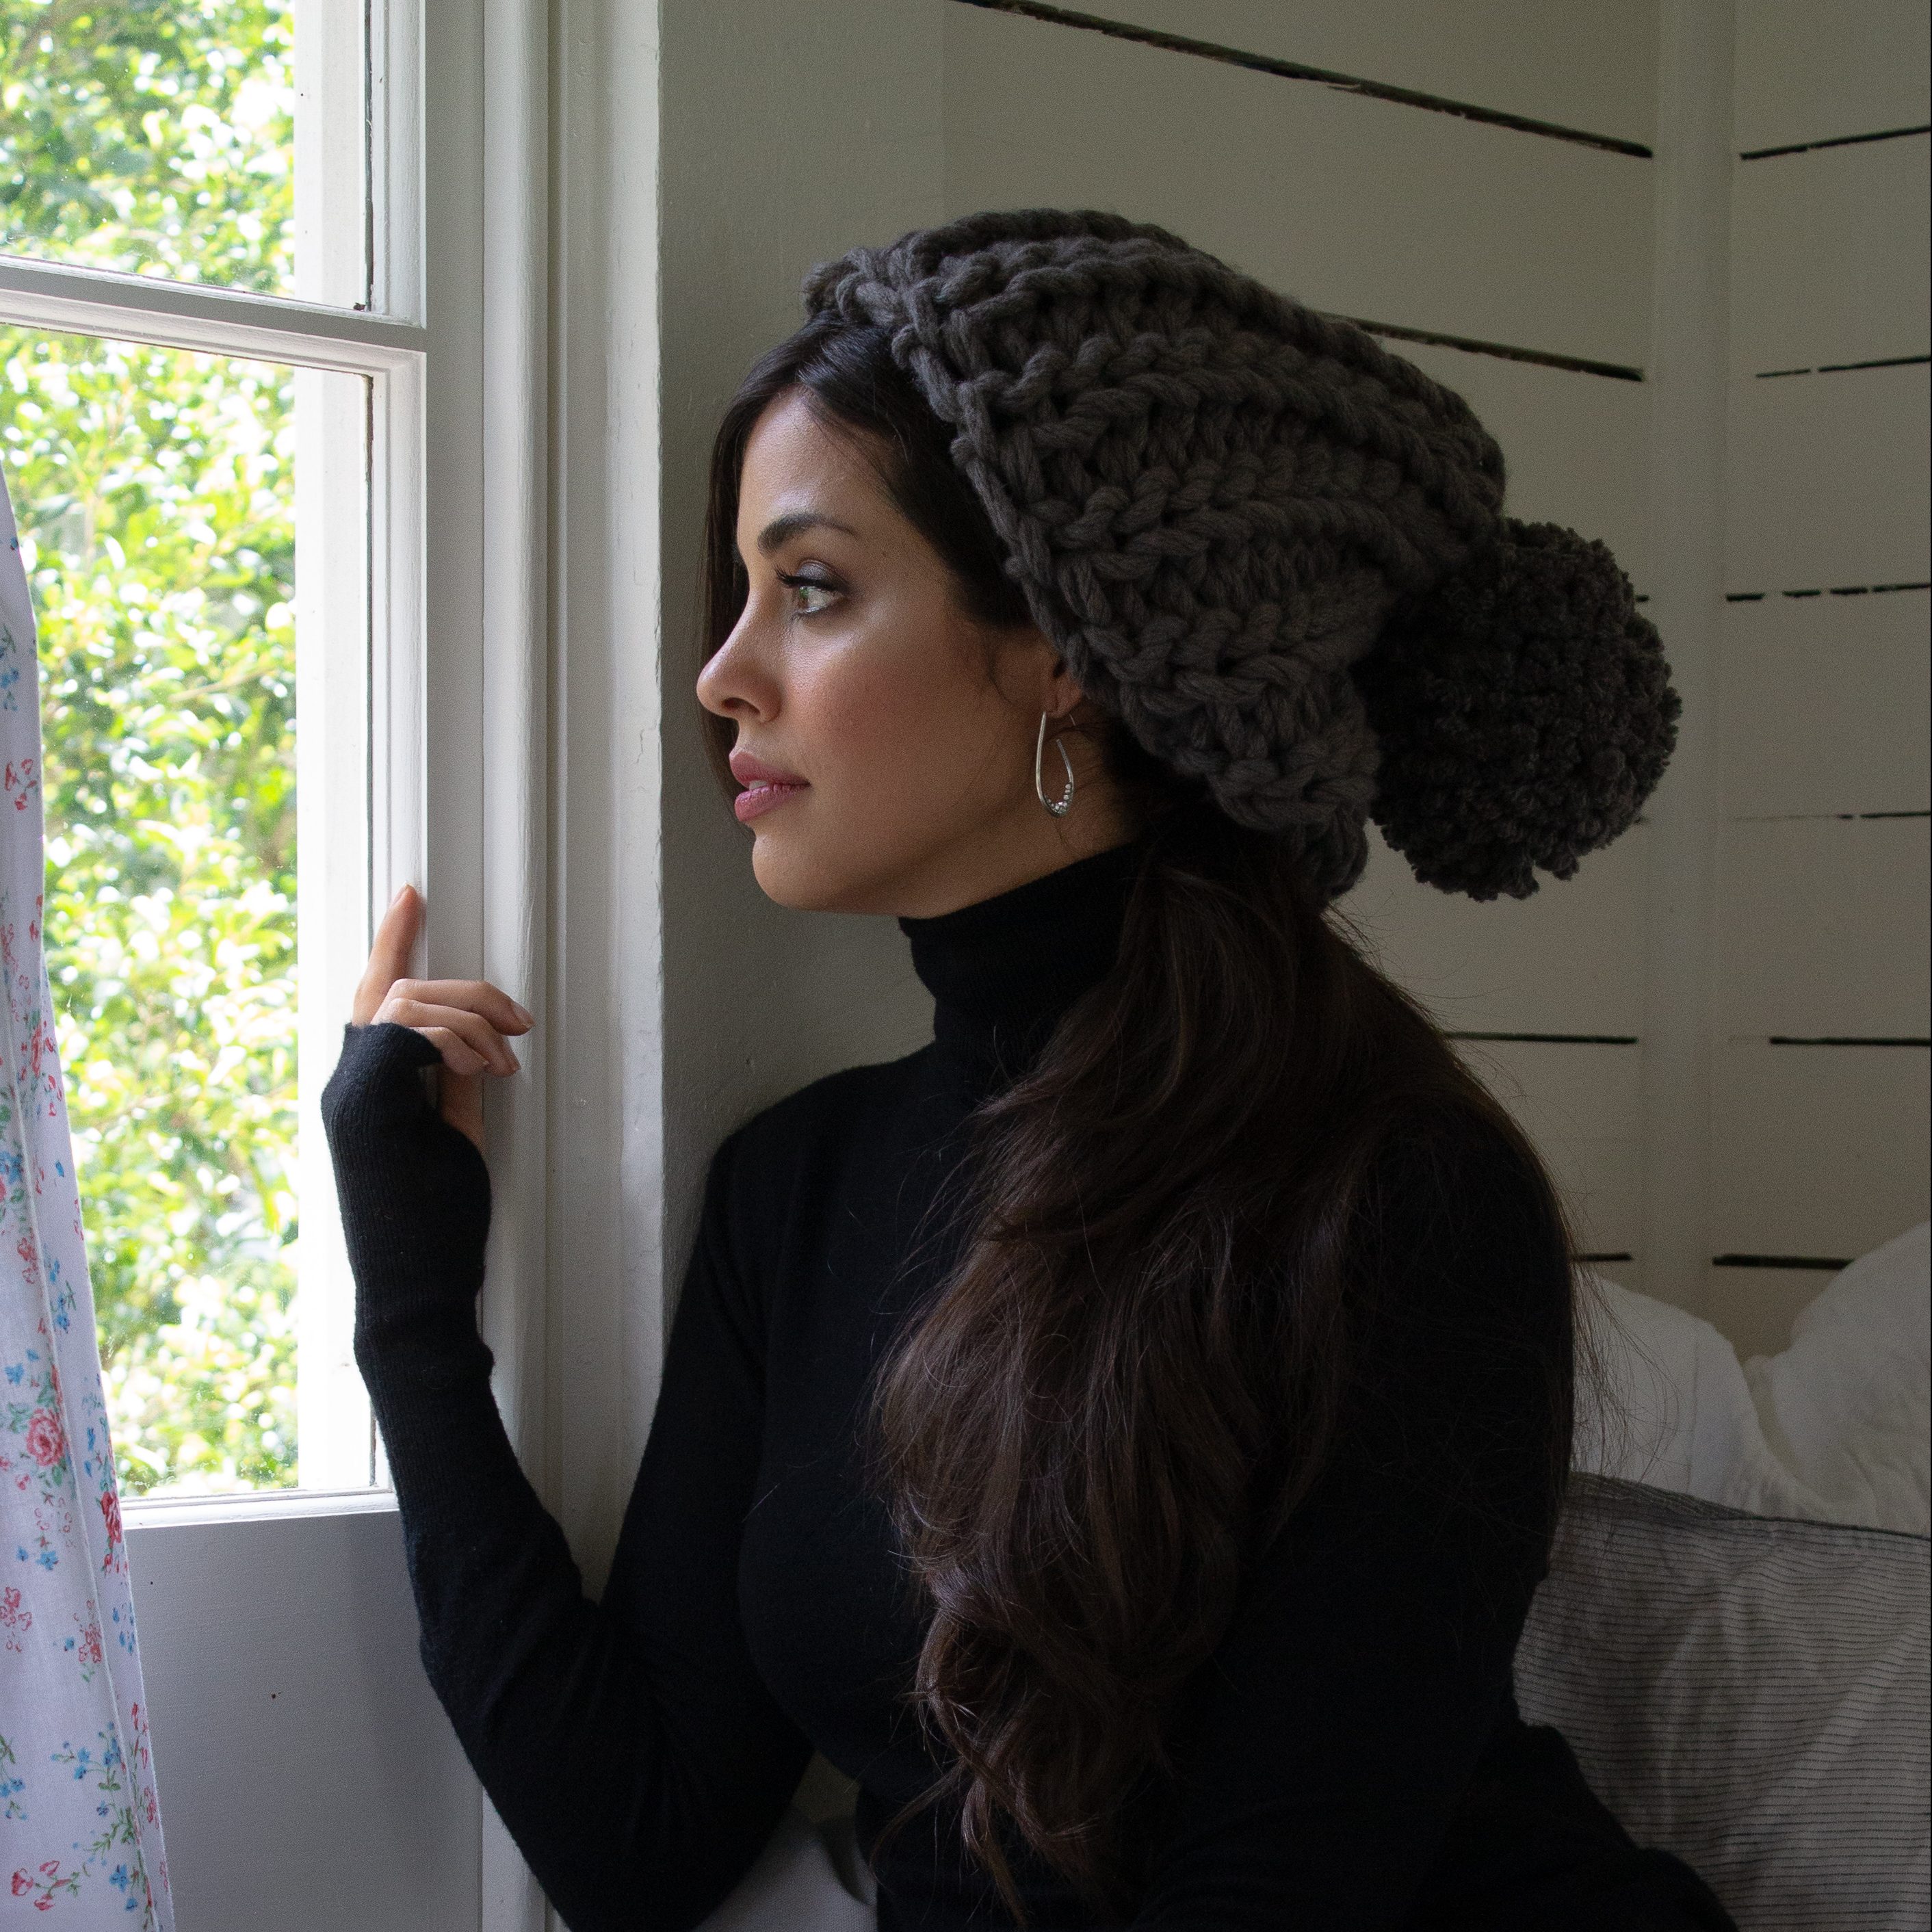
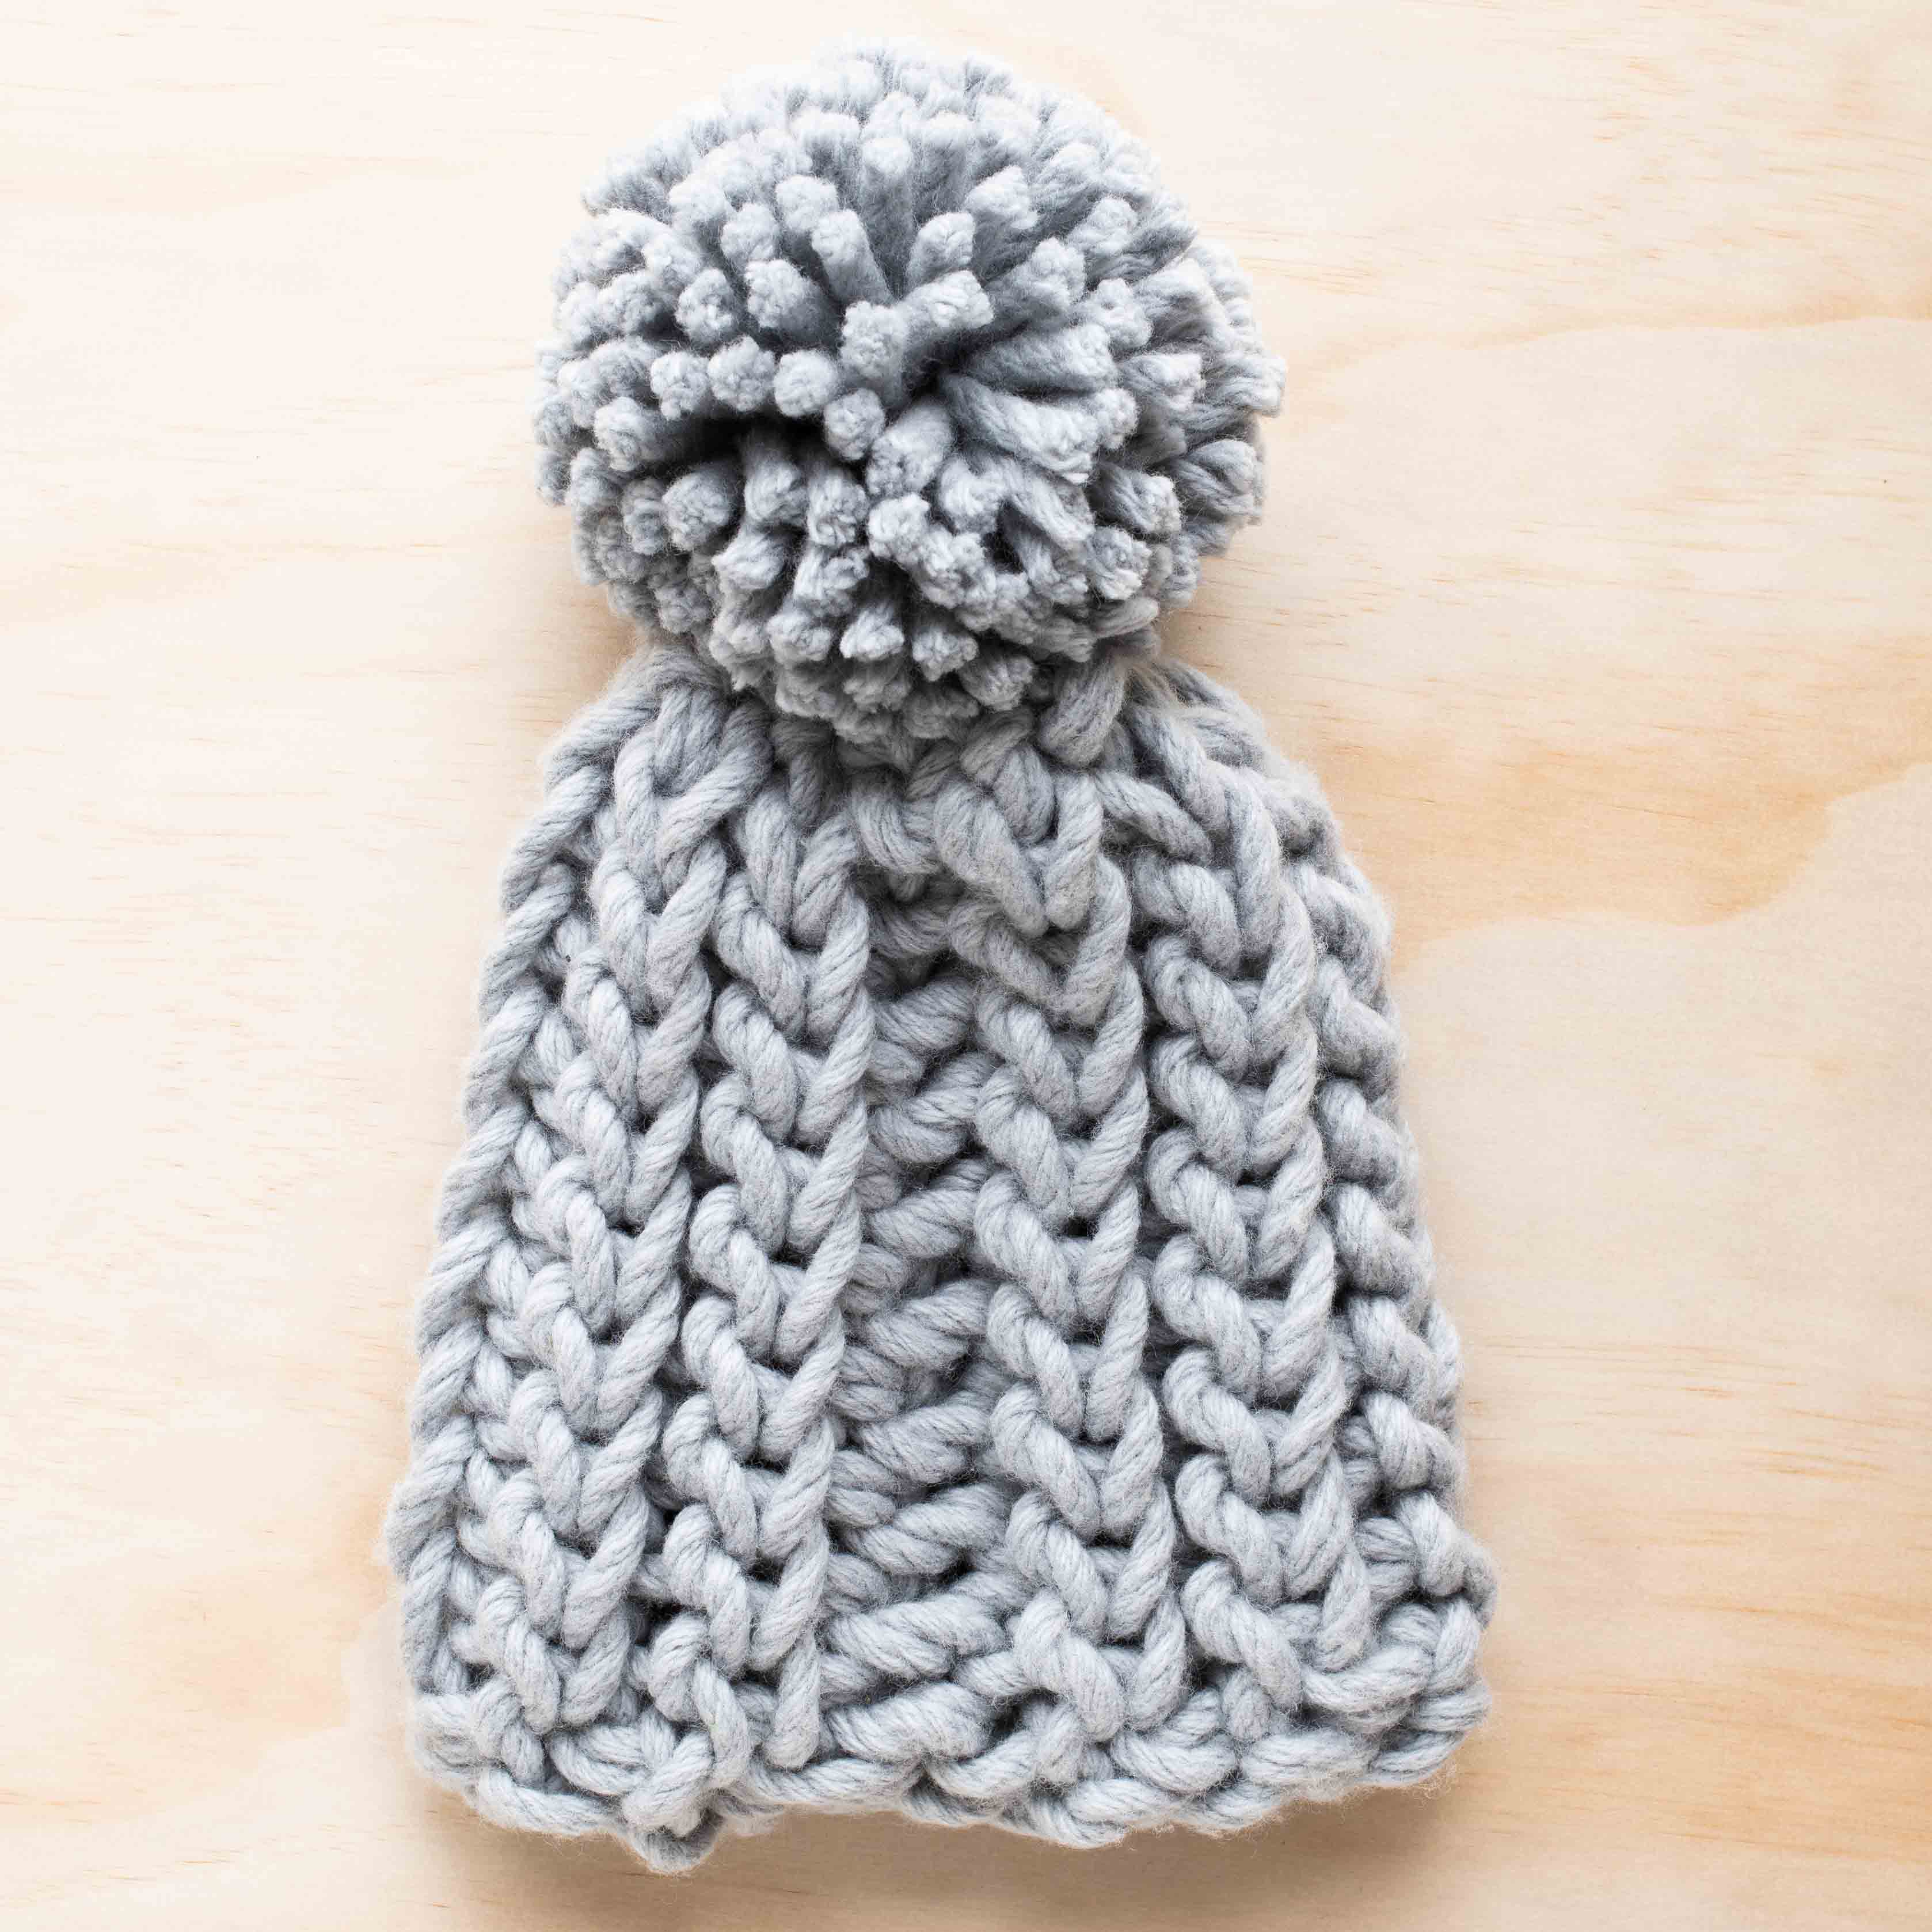
large size of the Toasty Heart Beanie
Your head and heart will be snuggly and warm when you’re wearing one of these soft and squishy chunky beanies.
The free crochet pattern is lovely and easy to make and even a bit addictive – you’ll be whipping up lots of chunky beanies before you know it.
Don’t worry if you’ve never crocheted before – I’ve included simple step-by-step instructions and video tutorials to help you out.
what we’re crocheting
We’re making a chunky Toasty Heart Beanie. It’s crocheted using gorgeously soft merino wool and it won’t take you long to make it. It’s made in 2 parts – the beanie body and the optional giant pompom.
The beanie body is made by crocheting a rectangle. The first and last rows are joined and gathered together to make the top of the beanie, and the giant pompom is tied on the top.
sizes
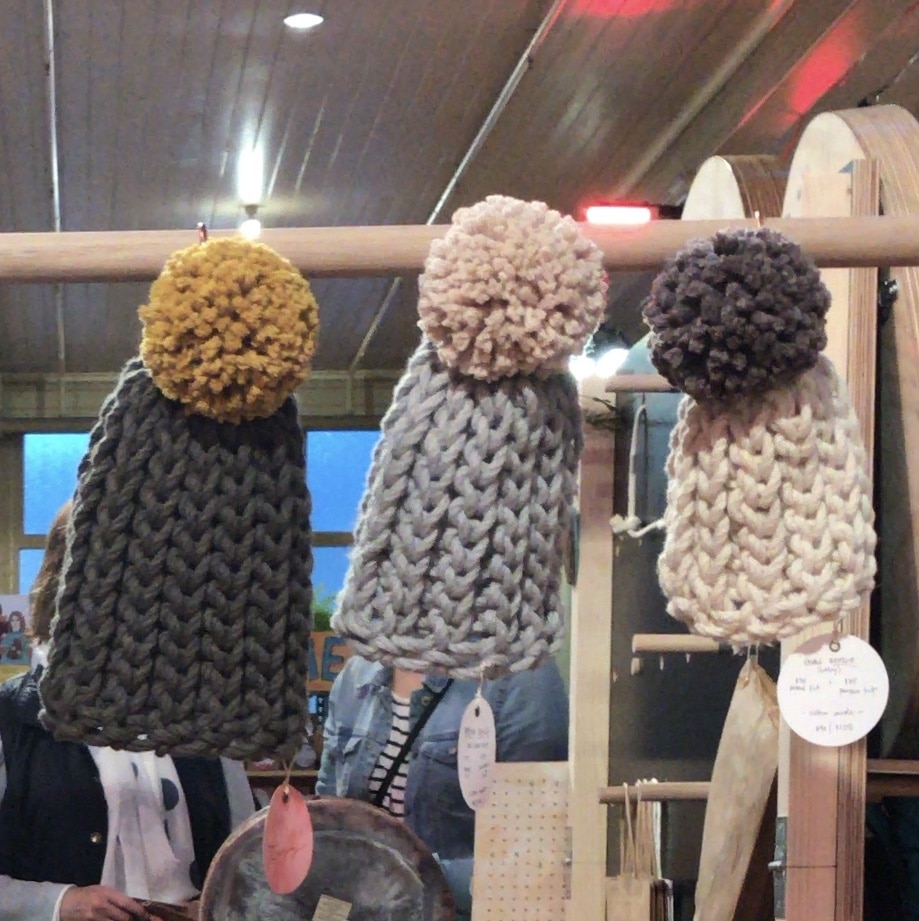
The Toasty Heart Beanie comes in 3 sizes:
- small – suitable for teeny tiny people (ie babies).
- medium – suitable for little people (ie kids) and small adults (this is the size I wear)
- large – suitable for larger adults
Each size has lots of stretch and can be worn with the brim folded up or unfolded. Folding the brim makes for a snugger fit for a smaller head.
The tension/gauge (stitch size guide) for this design is 7 rows and 5 stitches in a 10cm by 10cm square.
how to make a different size
Changing the size of your Toasty Heart Beanie is super easy. Here are a few different ways to do it:
- increase or decrease the number of stitches in the foundation chain to make your beanie longer or shorter, or
- increase or decrease the number of rows to change the size of your beanie around the head (or around the brim), or
- change the size of your chunky yarn or use a different sized crochet hook to change both the length and width of your beanie.
large, medium and small beanie sizes
what you’ll need
To make your Toasty Heart Beanie you will need:
- yarn for the beanie – 1 x 300g (10.5oz) skeins of Homelea Bliss yarn or 1 x 150g (5.3oz) ball of White Gum Wool Rope Boucle yarn (I just managed to squeeze a large beanie from 1 ball)
- yarn for the pompom – 1 x 100g (3.5oz) mini skeins of Homelea Bliss yarn or 1 x 150g (5.3oz) ball of White Gum Wool Rope Boucle yarn
- 25mm (U) bamboo crochet hook
- 18, 22 or 26 jumbo locking stitch markers (depending on the beanie size)
- Clover extra large pompom maker
- scissors
- tape measure
- the desire to make something beautiful
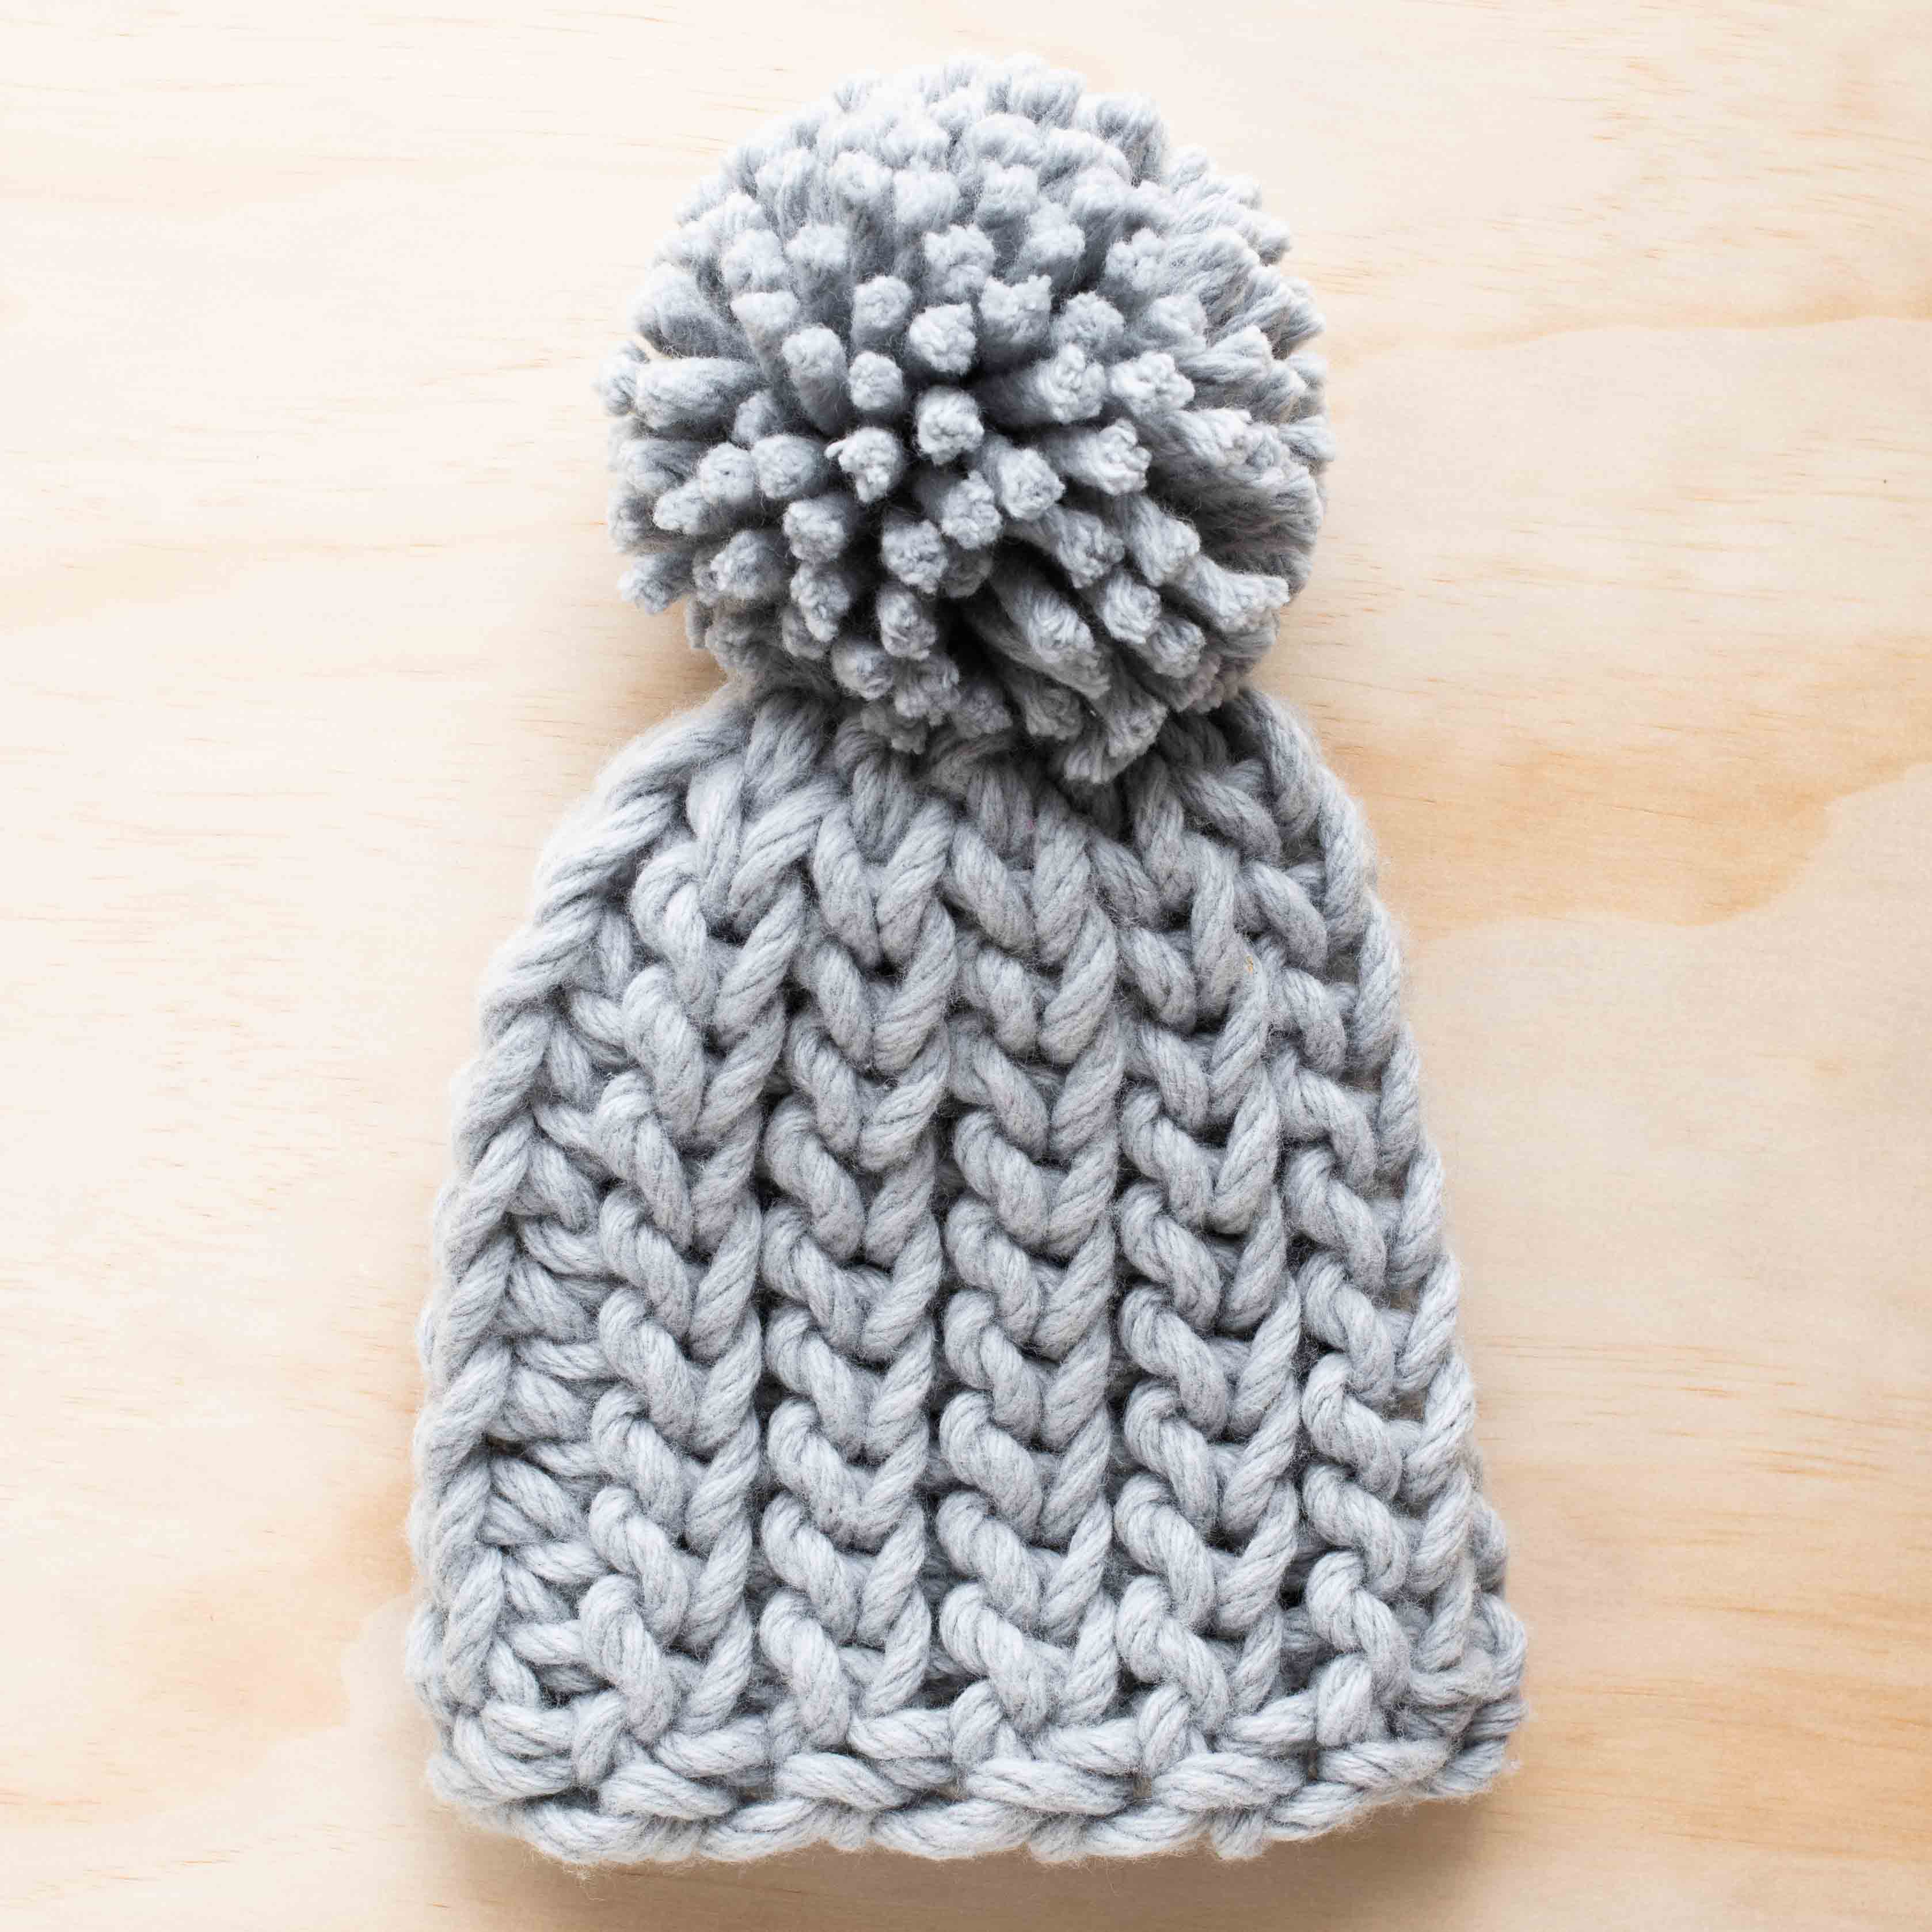
Medium Toasty Heart Beanie made with Homelea Bliss wool yarn
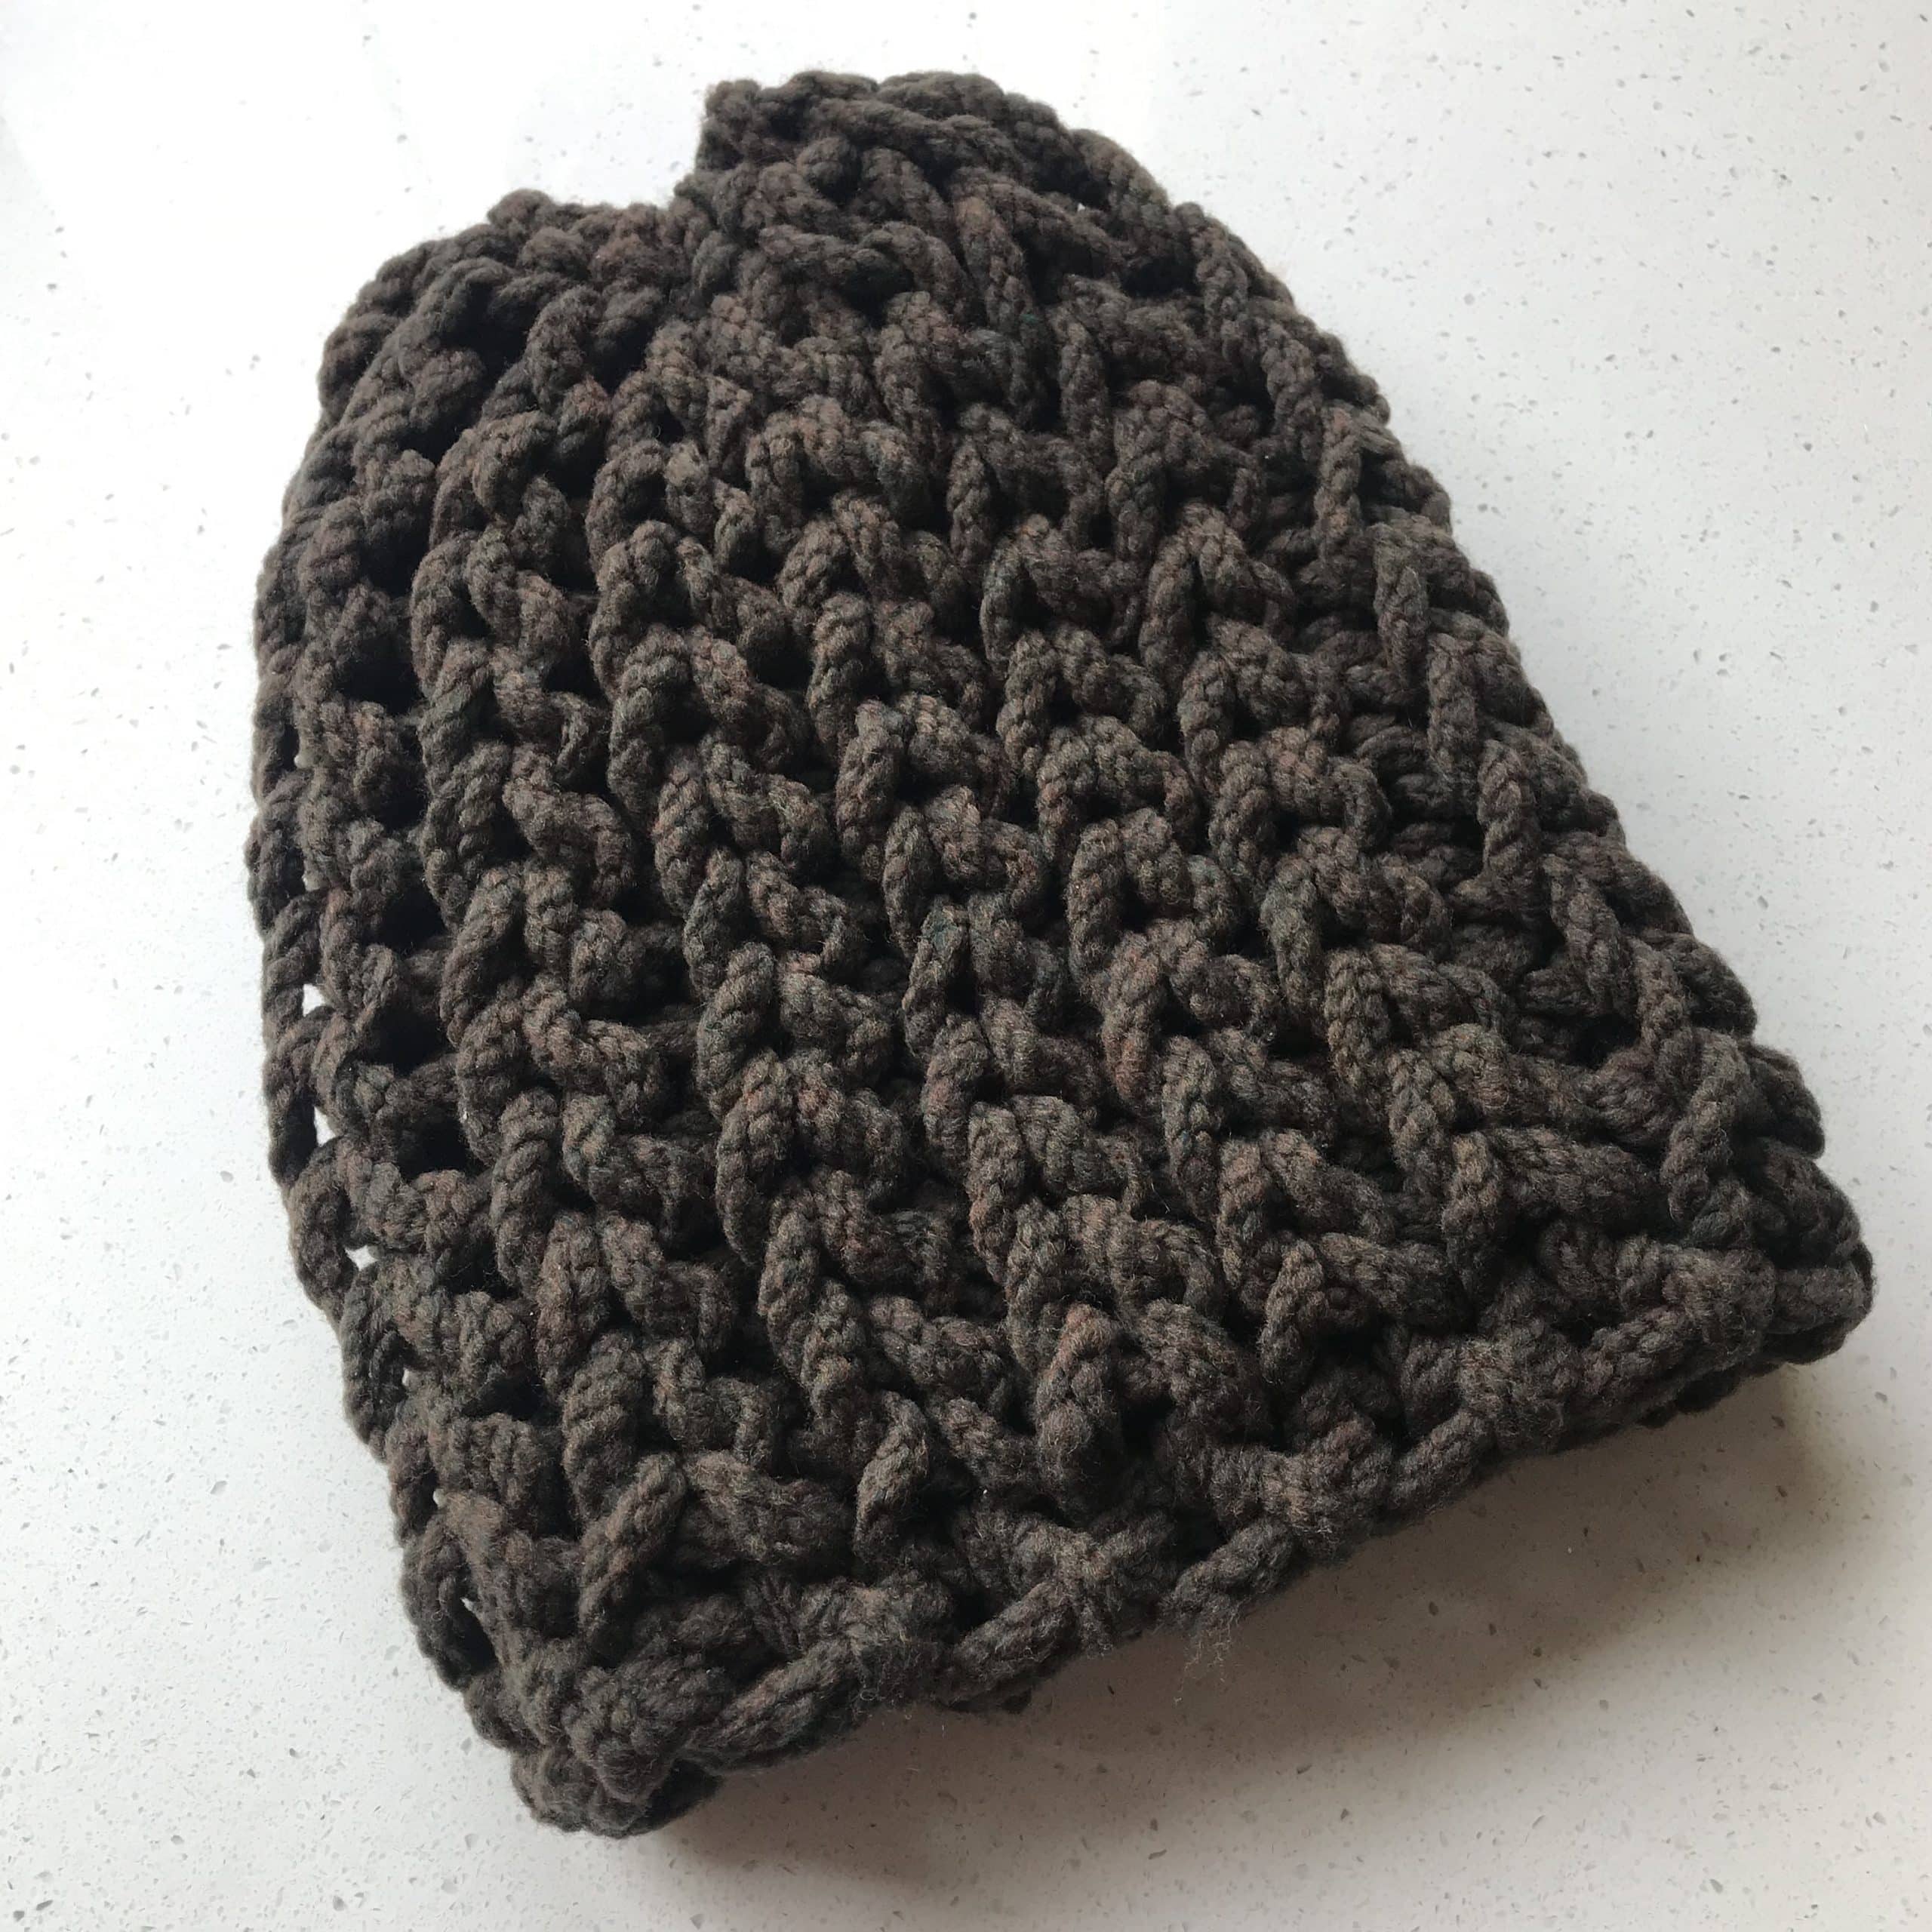
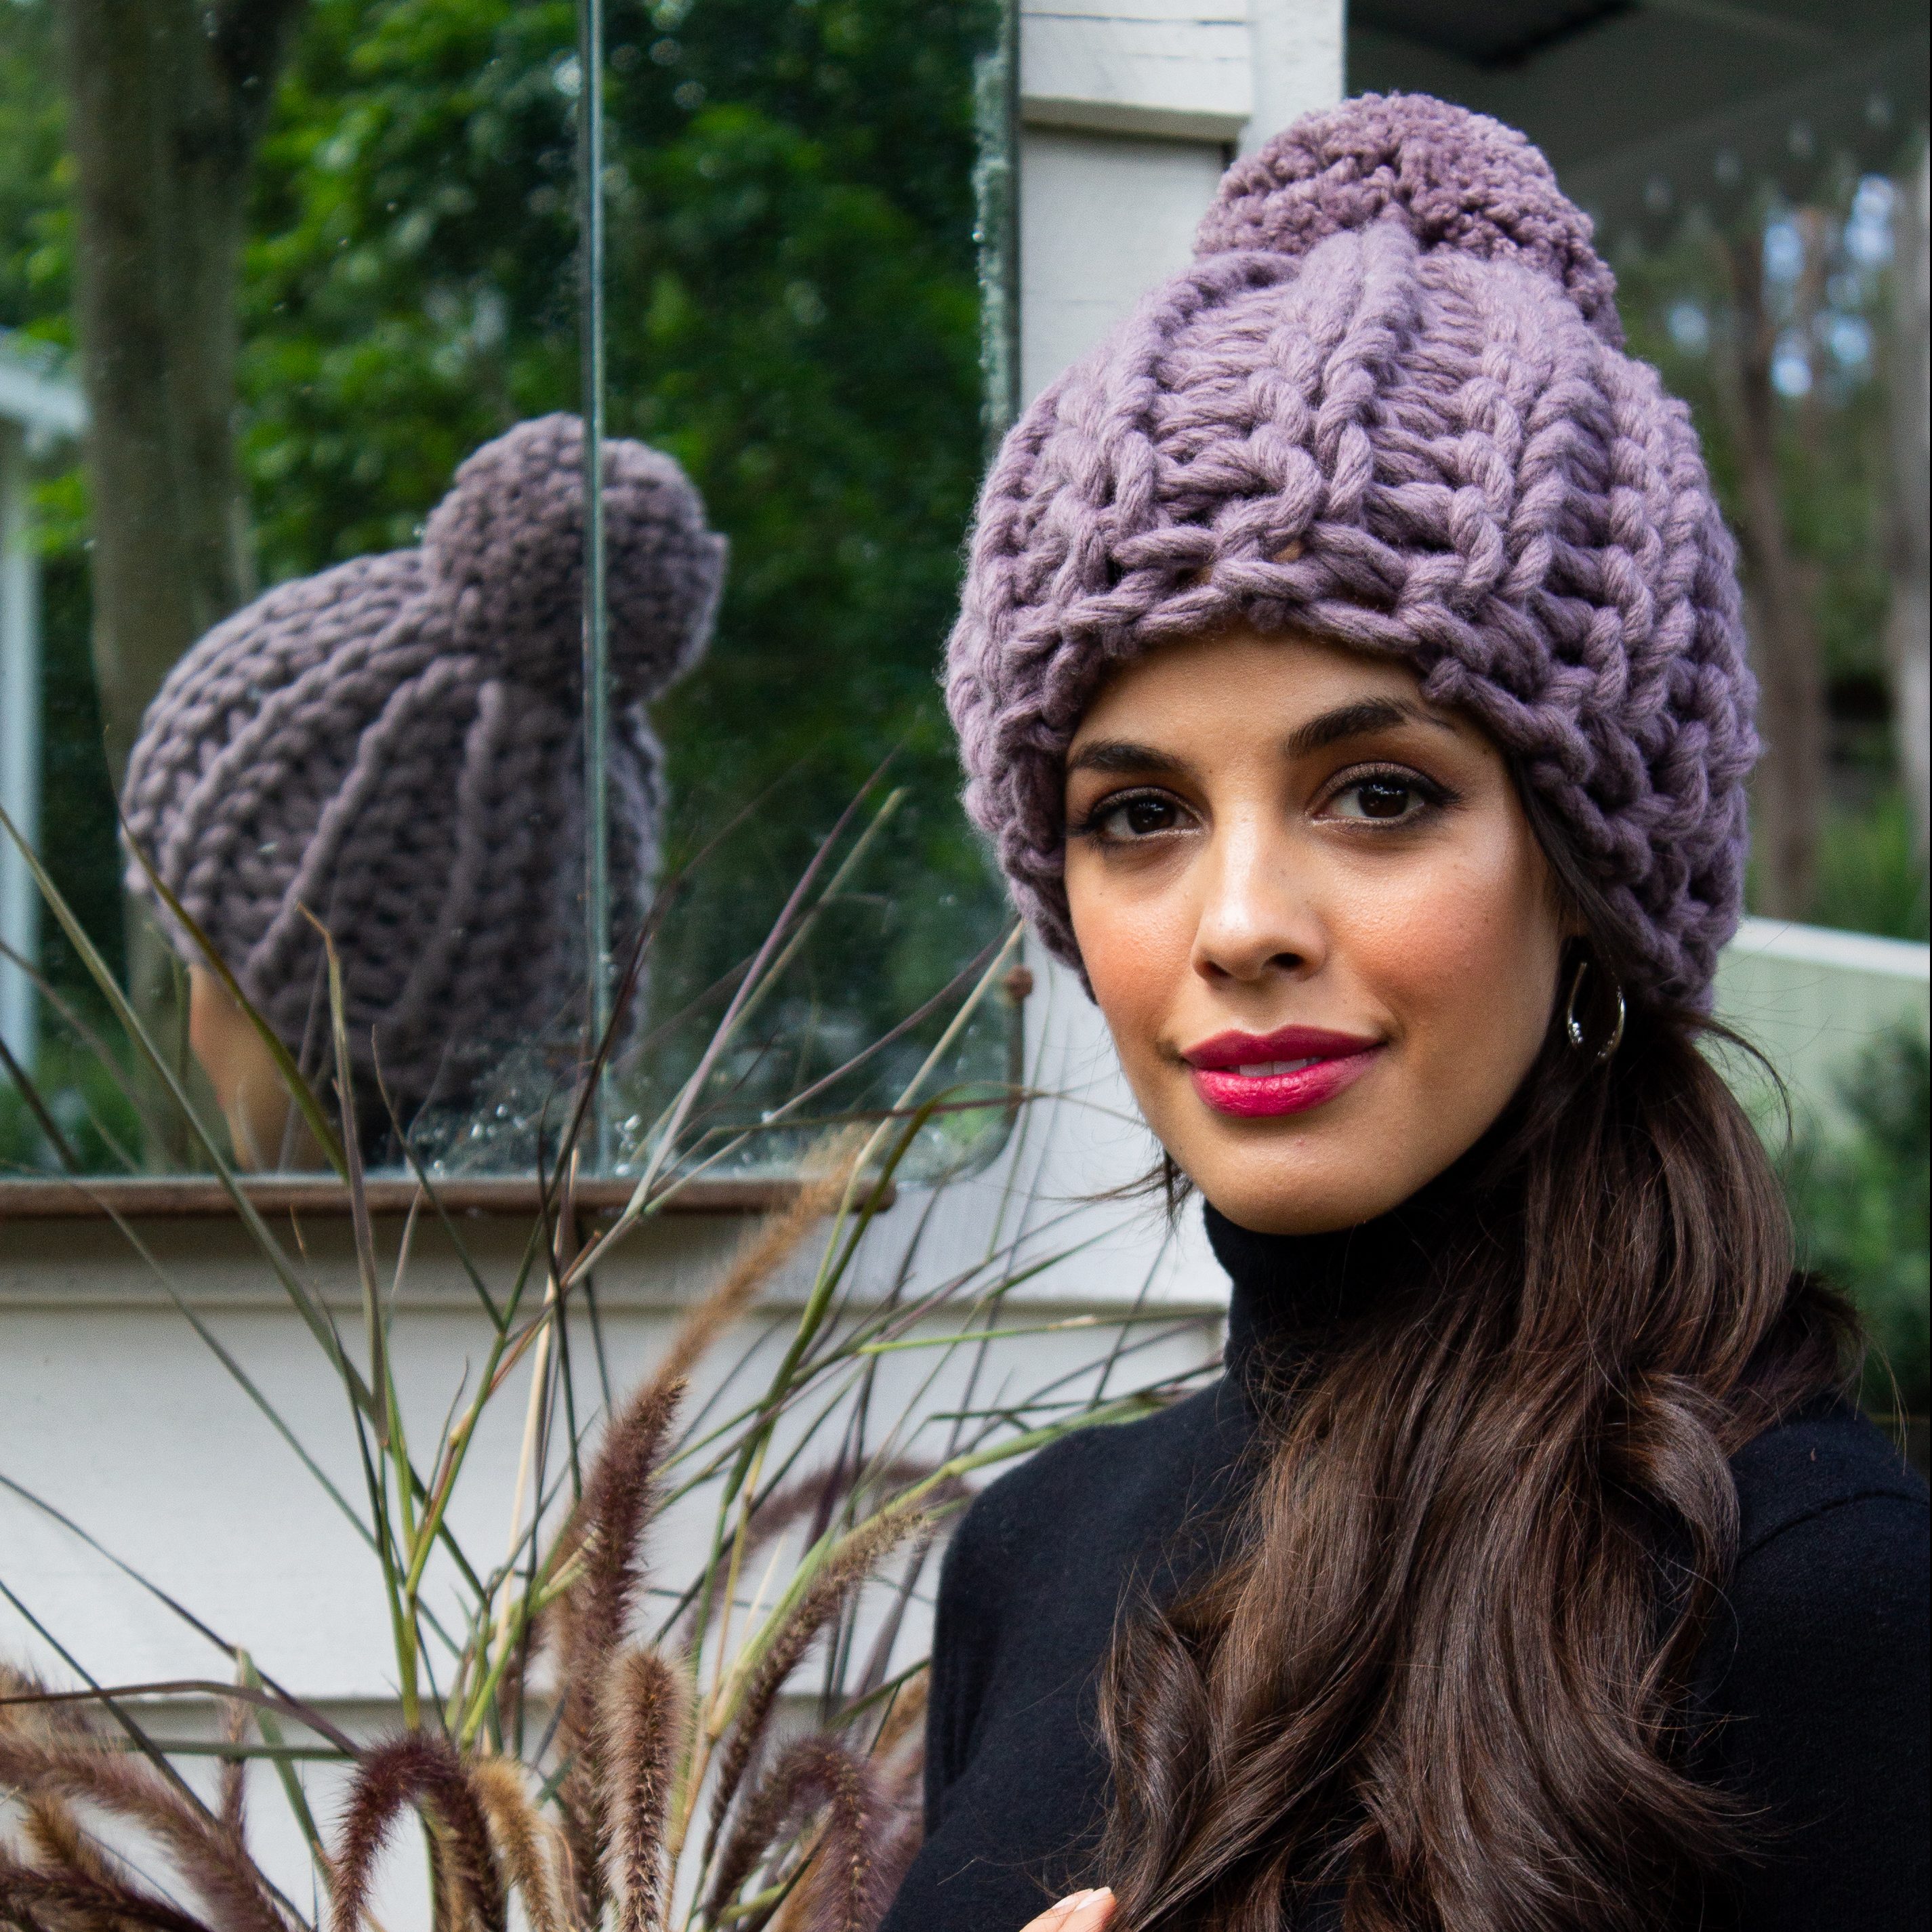
Large Toasty Heart Beanie made with White Gum Wool Rope Boucle yarn
how to read this crochet pattern
Before you pick up your chunky crochet hook, I’d love to share with you the basics of reading crochet patterns, and what you’ll come across in this pattern.
I’ve written this crochet pattern so it is easy for you to follow. You’ll find a lot of the elements here (like the terminology and abbreviations) in every good crochet pattern you come across. Reading crochet patterns is just like eating an elephant – when you take it one bite (or step) at a time, it’s easy to do. The basic elements of crochet patterns are the stitches, and the easiest way to work through a crochet pattern is to go one stitch at a time.
Each type of stitch has a name, and crochet patterns are written in one of two stitch terminologies – UK or US. This pattern is written in both UK and US terminology. The abbreviations that are used throughout this pattern for the stitch names are summarised in the table below.
| abbreviation | UK terminology | US terminology |
| ch | chain | chain |
| slst | slip stitch | slip stitch |
| st(s) | stitch(es) | stitch(es) |
Throughout this crochet pattern, you’ll notice curvy brackets at the end of the row – this indicates the number of stitches in the row. For example, {5 sts} means that there are 5 stitches in the row. Counting the number of stitches at the end of each row is a good way to check that you haven’t gained or lost any stitches during the row.
The number of stitches in each row varies due to the size of your beanie. This is written as small (medium, large). For example, 9 (11, 13) means 9 stitches for a small size, 11 stitches for a medium size and 13 stitches for a large size.
it’s good to know
- Your Toasty Heart Beanie will relax a bit once you start wearing it – this is one of the beautiful properties of wool. If it’s a bit small to start with don’t worry – give it a good tug and see how it feels after you wear it a couple of times.
- I’ve found that when I crochet with chunky yarn and a huge hook I hold the yarn and hook differently to when I’m using “normal” sized yarn because of the extra size and weight. To avoid discomfort in my arms and hands I share the crocheting movements between both arms and it becomes a full upper body workout! I also try to be aware of my posture as I’m crocheting.
- This beanie is made using slip stitches through the back loop. Some people find this a tad tricky to do, but I’ve discovered the secret is to keep your tension nice and loose, and to take your time.
- To ensure the edges of your crochet are nice and strong (and to make sure the brim doesn’t stretch uncontrollably) we’ll do the slip stitches at each edge through both loops.
- To keep your edges looking neat make sure you turn the same way at the end of each row.
- We’re going to put a stitch marker on the first stitch of each row to be able to easily count the number of rows – I find counting slip stitch rows really difficult! We’ll then use the stitch markers to help create a neat join along the back of your beanie.
step 1 – turn your yarn skeins into balls
The first thing you’ll need to do is turn your chunky skeins of Homelea Bliss wool yarn into balls – this makes crocheting heaps easier!
The easiest way to do this is to:
- open up the skein
- lie the skein flat and in a circle in front of you
- untie or cut the loops that are holding the yarn together
- find the end
- carefully unwind some of the yarn
- wrap the end around your fingers a couple of times
- slip the yarn off your fingers, fold it in two and then wind the yarn around this to start creating a ball
- keep carefully unwinding the skein and wrapping it around the ball until you’re finished.
Note – if you have a yarn swift you can put the opened skein on your swift and unwind it from here.
step 2 – foundation chain
make a slip knot
Let’s start out using your 300g skein of Homelea Bliss.
Most crochet and knitting patterns start with a slip knot – this is an adjustable loop that becomes the first stitch. There are lots of different ways to do these and each one works fine.
The important thing to remember is that the end attached to the ball needs to make the loop bigger and smaller and that the other end needs to be at least 30cm (11.8in) long.
place the slip knot on the crochet hook
The slip knot goes onto the crochet hook, and this makes the first stitch.
The size of the slip knot is important for determining the size and consistency of the stitches in your crocheting. With practice, you will discover the right size for your crocheting – don’t be afraid to try different sizes.
how to hold the crochet hook and yarn
There are different ways to hold the crochet hook and yarn, and the best way to do it is to do what feels best for you – the important thing is that you can control the hook. Experiment with different ways until you find something that works for you.
I’m right-handed, and I hold the hook in my right hand and the yarn in my left hand. If you’re left-handed, it’s the other way around.
make the chain stitches
The foundation chain provides the “foundation” for the first row of stitches to be worked into.
To make your foundation chain:
- make a chain:
- wrap the yarn around the hook from back to front, and
- pull the yarn through the loop on the hook.
- at the end of a chain stitch, you will only have one loop on your hook. From now on we will refer to a chain as “ch”.
- make another 8 (10, 12) ch – remember from earlier on that this means 8 ch for a small size, 10 ch for a medium size and 12 ch for a large size? {9 (11, 13) sts}
count the number of chain stitches
Each chain stitch has a “V” and to count the number of chain stitches simply count the number of “V”s. You should have 9 (small), 11 (medium) or 13 (large) stitches or “V”s.
step 3 – row 1
There is a total of 18 (22, 26) rows in your Toasty Heart Beanie, and we’re about to start the very first one!
To make row 1 do the following:
- turn the foundation chain over so the “V”s are facing down and the “knobbly bits” are facing up.
- hold onto the “knobbly bit” of the ch closest to the hook with your hand that’s not holding the crochet hook.
- make a slip stitch (slst):
- slide the hook through the “knobbly bit” of the ch you’re holding onto. You do this by going through the front (the side facing you) to the back.
- wrap the yarn around the hook and pull it back through the “knobbly bit”.You should have 2loops on your hook.
- pull the loop closest to the hook through the other loop on your hook. You should have 1loop left now.
- as this is the first stitch of the row, put a stitch marker through both legs/loops of this stitch.
- we’re now going to refer to slip stitches as “slst”.
- make another 8 (10, 12) slst until you reach the end of the row.
- turn. {9 (11, 13) sts}
If you’re finding it difficult to do the slip stitches I’ve got a handy hint for you – hold the hook and yarn nice and loose. You may find it easier to do larger loops, and don’t forget to think happy thoughts.
count the stitches in the row
Normally at the end of the row, you’ll see the stitch count – for example {9 (11, 13) sts}. Since this is the first row, I’ve decided to separate it out and explain a bit about it.
It’s a good idea to count the number of stitches in the row so that you can tell if you’ve added extras or lost some during the row.
Each stitch has a “V” on the top. It’s easy to count the number of stitches,– simply count the “V”s on the top of the row. The number of stitches should be the same as the pattern, in this case, 9 for a small size, 11 for a medium size and 13 for a large size.
If you don’t have the correct number of stitches it’s easy to fix – simply work out where the problem happened, pull out your crocheting to this point and redo your stitches.
step 4 – row 2
Row 2 is a little different to row 1 because the stitches we’re working into will have the 2 legs (or loops) of the “V” facing up.
To make row 2 do the following:
- hold onto the st closest to the hook with your hand that’s not holding the crochet hook (this is the last stitch of row 1).
- make a slip stitch (slst):
- slide the hook through the 2 legs of the “V” of the stitch you’re holding onto. You do this by going through the front (the side facing you) to the back.
- wrap the yarn around the hook and pull it back through the 2 legs. You should have 2 loops on your hook.
- pull the loop closest to the hook through the other loop on your hook. You should have 1 loop left now.
- put a stitch marker through both legs of this st as this is the first st of the row.
- do another 7 (9, 11) slst, this time only go under the leg of the “V” that is furthest away from you – this is called “slst through the back loop”.
- do another slst, this time through both legs of the stitch below it.
- turn and don’t forget the count the number of stitches in the row. {9 (11, 13)}
check the width of your crocheting
Now that you’ve done a couple of rows it’s a good time to check the width of your crocheting. To do this lie your crocheting out flat and measure the length of row 2.
The design has the width of 22cm (8.7in) for the small size, 26cm (10.2in) for the medium size and 30cm (11.8in) for the large size. If the length of row 2 is close to this, it means that your tension is good.
- If your width is shorter than the design – it means that your tension is tighter than the design. You can change this by using a larger crochet hook, or, you can just keep going. You may find that as you progress you’ll relax, and your stitches will get looser (and your rows will get longer).
- If your width is longer than the design – it means that your tension is looser than the design. You can change this by using a small crochet hook, or, you can just keep going. You may find that as you get more familiar with making the stitches, your stitches will get closer together (and your rows will get shorter).
step 5 – row 3 to the end
Keep repeating the steps below until you reach the last row for your beanie size:
- do a slst (through both loops of the stitch below) and place a stitch marker through it.
- make 7 (9, 11) slst through the back loop only.
- do the last slst through both loops of the stitch below.
- turn. {9 (11, 13) sts}
The total number of rows for the beanie sizes are:
- small – 18 rows
- medium – 22 rows
- large – 26 rows
step 6 – join the ends together
We’re going to join the first and last edges of your crocheting using slip stitch.
Before we do this it’s important to prepare for this step properly – otherwise, your join won’t be neat and even:
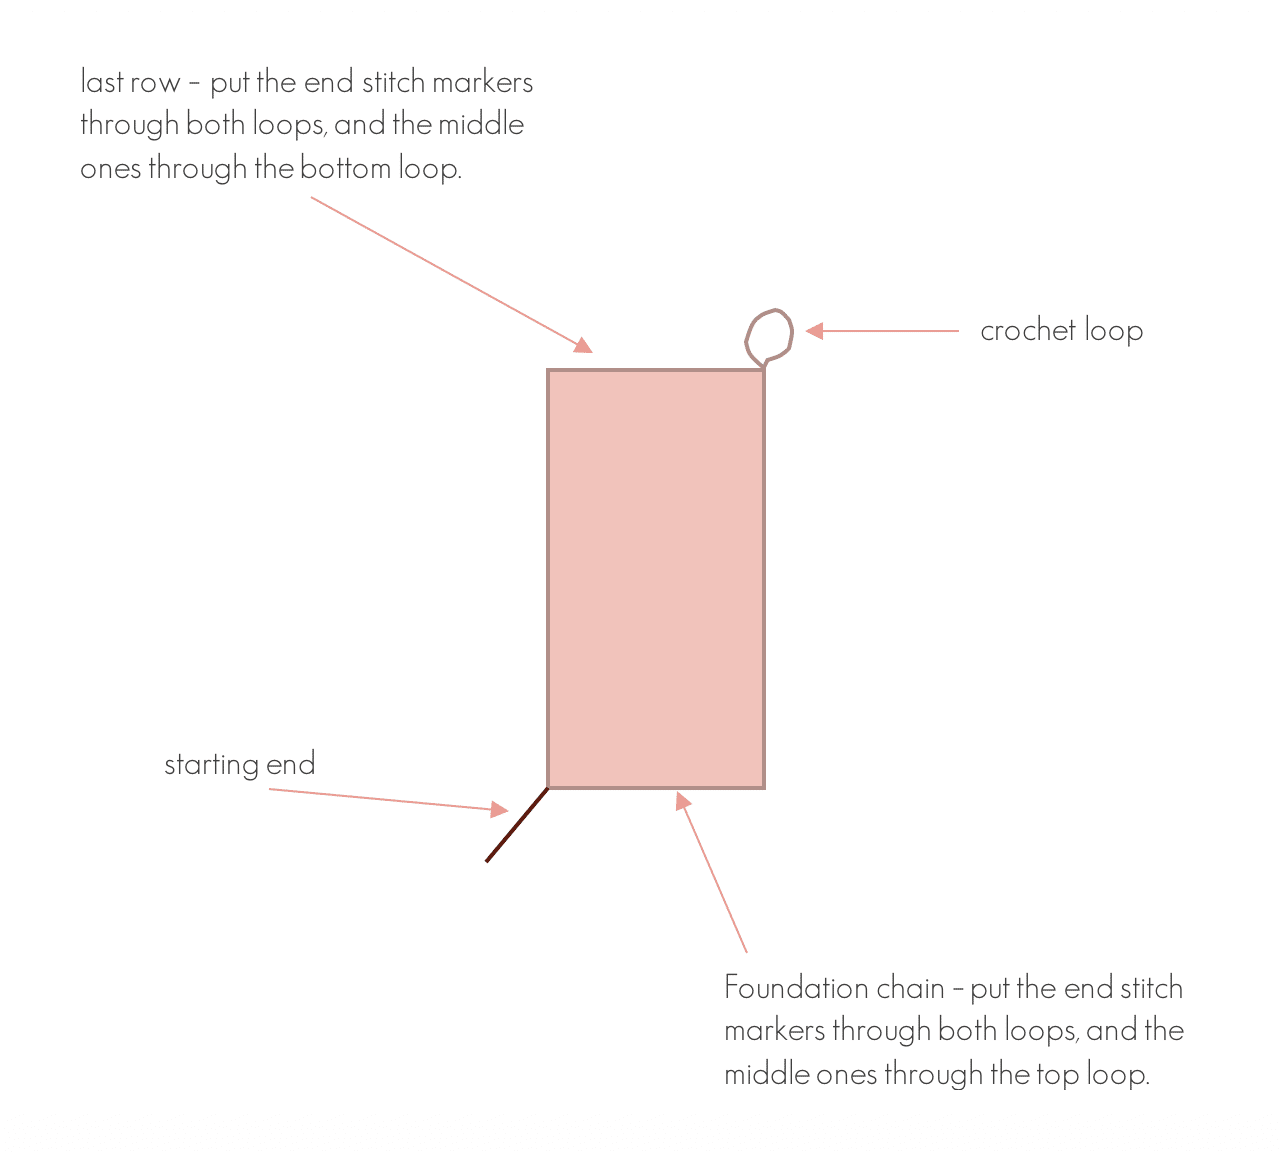
- lie your crocheting out like the diagram below – the crochet loop needs to be on the top right, and the starting end is on the bottom left. The side that is facing up will be the outside of your beanie.
- remove the stitch markers from the sides of your crocheting.
- on the foundation chain – place stitch markers through both loops of the first and last stitch, and on the middle stitches, place stitch markers through the front (top) loop only.
- on the last row – place stitch markers through both loops of the first and last stitch, and on the middle stitches, place stitch markers through the back (bottom) loop only.
Okay, now we’re ready to join!
To join your beanie:
- fold the foundation chain up to the last row (the foundation chain will be lying on top of the last row).
- hold onto the 2 sts that are closest to the hook (both the foundation chain and last row) with your hand that’s not holding the crochet hook.
- slst through both loops of the first 2 stitches – the loops are marked with the stitch markers.
- make another 7 (9, 11) slst through the loops with the stitch markers only.
- slst through both loops of the last stitch – the loops are marked with the stitch markers.
the join from the outside of the beanie
step 7 – finishing off
fasten off
This is how to fasten off your beanie:
- cut the yarn about 50cm (19.7in) from the last stitch.
- pass the cut end through the loop and pull it to tighten the loop.
gather the top of your beanie
We’re going to gather together the top of your beanie using the cut end you just fastened off with:
- weave the end through the gaps around the edge closest to the cut end.
- push the gathering up to create the smallest hole possible.
- secure the gathering by tying a knot using the start end and cut end.
weave in the ends
We’re going to weave in the 2 ends, so they are secure within your crocheting.
This is what to do:
- using your fingers, weave the end through different loops, trying to make it as invisible and uniform as possible.
- tie a knot after the last stitch (to keep it from unravelling).
- trim off the end at the knot.
- give it a bit of a jiggle and check it sits okay.
Now the ends are woven in you can turn your beanie inside out so the slst seam is on the inside – how good does it look!
step 8 – make the giant pompom
Now it’s time to use your 100g mini skein of Homelea Bliss.
Making giant pompoms is so much fun! This is how to make them:
- start by unclipping both arms on one (blue/aqua) side of your Clover Extra Large Pompom Maker.
- wrap the yarn around both arms, placing the yarn side by side on the inside of the curve. Do 6 layers of this, cut the yarn and then clip the arms back into position.
- unclip the arms on the other side of your Pompom Maker and do another 6 layers of yarn. Cut the yarn and the clip the arms back into position.
- cut a length of yarn about 50cm long. Separate it into 3 stands – we’re going to use one of these as a tie to hold the pompom together.
- using your scissors, cut along the V groove between the arms, and continue doing this around the pompom maker.
- tie the pompom together by wrapping the tie around the V groove, pull it tight to secure the pompom and tie into a knot.
- gently unclip one side of the pompom maker, and then do the other side. Pull the 2 white sections of the Pompom Maker apart.
- once you’ve removed your pompom, wrap the tie yarn around again and secure with another knot.
- put your pompom maker back together.
- trim your pompom gradually to make it look more even.
step 9 – attach the pompom to the beanie
Attach your giant pompom to your beanie by doing the following:
- thread the 2 ends of the pompom tie through the top of your beanie. Try and keep them on opposite sides of the hole.
- on the inside of your beanie, pull the ties tight so the pompom is snuggly against the beanie – I do this holding my beanie upside down.
- tie a knot in the ties to secure the pompom.
- weave the tie ends into the inside of your beanie.
Yay! You’ve finished your Toasty Heart Beanie!
I hope you’ve loved making your Toasty Heart Beanie! Who will you make one for next?
With love, Lynda.
The online course with pdf crochet patterns is available here, and the chunky crochet bundle is available here.
medium size of the Toasty Heart Beanie